I have created a very simple Excel sheet to calculate sprite values for monochrome sprites.
Here’s what the sheet looks like:
I have created a very simple Excel sheet to calculate sprite values for monochrome sprites.
Here’s what the sheet looks like:
The Kolakoski sequence is a strange but kind of fun sequence of integers.
All the members of the sequence are either 1 or 2. The sequence is made up of successive “runs” of 1’s and 2’s. Sometimes a run is one element long, and sometimes it is two elements long. If a particular run is made up of 1’s, the next run must be made up of 2’s. And vice versa.
The nth element of the sequence tells you how long the nth run of the sequence is.
The first element of the sequence is a 1.
So the first run has only one 1 in it, which means that the next element has to be a two. So now the sequence is 1, 2
But the second element of the sequence being a 2 tells us that the second run has to be two elements long, so the sequence has to be 1, 2, 2.
So we have first three elements (1, 2, 2), and the first two runs (1, and then 2,2).
Now let’s work on the third run. The third element of the sequence is a 2, so the third run must be two elements long, and since the second run was made up of 2’s, the third run must be made up of 1’s (two of them). So now the sequence is 1, 2, 2, 1, 1
Now let’s go on to the fourth run. It has to be made up of 2’s, since the third run was made up of 1’s, and the fourth element in the sequence, which tells us how long the fourth run is, is a 1. So now the sequence is 1, 2, 2, 1, 1, 2.
One more time. Let’s look at the fifth run. It has to be made up of 1’s, since the fourth run was made up of 2’s. How many? Well, the fifth element in the sequence is a 1, so the fifth run is one element long, and that element has to be a 1. So now the sequence is 1, 2, 2, 1, 1, 2, 1.
And so on.
The sequence is described in the Online Encyclopedia of Integer Sequences, in which it is sequence A00002, and in this Wikipedia article.
It has not yet been proved whether the sequence, as it gets longer and longer, converges to having closer and closer to 1/2 of its elements be 1’s, but it has been proved that it is very close, and in computation it seems to get closer the larger the sequence gets. See the Wikipedia article for more on that.
So …
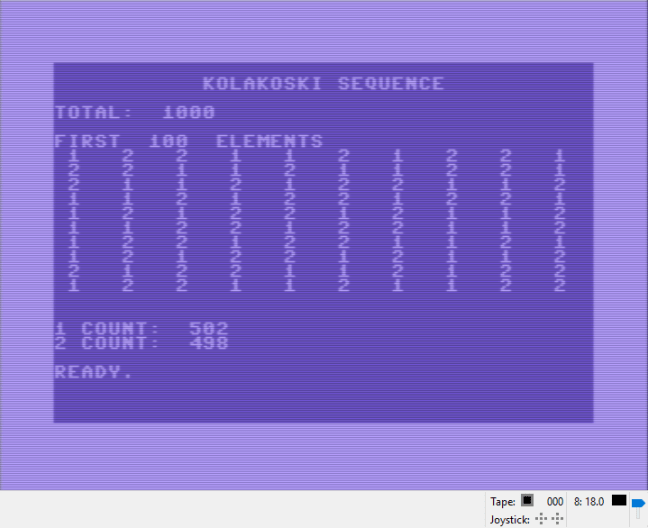
I programmed my C64 to calculate the sequence out to a limit of 1000 elements, and to print the first 100 elements, and then to report on the number of 1’s and 2’s in the first 1000 elements.
First, here is the program:
5 rem  ================================
6 rem
10 rem exploring the kolakoski sequence
15 rem
20 rem ================================
50 m = 1000
100 dim a%(m+1)
120 a%(1) = 1
130 c = 2
140 cc = 1
150 if cc >= m then goto 5000
160 d = a%(cc)
170 e = 2
180 if d = 2 then e = 1
185 cc = cc + 1
190 a%(cc) = e
210 if a%(c) = 2 then cc = cc + 1:a%(cc)= e
220 c = c + 1
230 goto 150
220 c = c + 1
 230 goto 150
 5000 ct1 = 0 : ct2 = 0
 5020 print chr$(147)
 5025 print "           kolakoski sequence": print
 5030 print "total: ";m
 5035 print
 5040 mm = m : if mm > 100 then mm = 100
 5045 print "first ";mm; " elements"
 5050 for i = 1 to m
 5100 if i <= mm then print a%(i);" ";
 5150 if a%(i) = 1 then t1 = t1 + 1
 5170 if a%(i) = 2 then t2 = t2 + 1
 5200 next i
 5250 print:print
 5300 print "1 count: ";t1
 5310 print "2 count: ";t2
Here is the screen shot:

This post is a consideration of the C64 keyboard. It is not exhaustive, and it is not systematic. I just want to consider a couple of topics: the keyboard matrix, keyboard codes, the conversion tables, and the keyboard buffer.
When a key is pressed on the keyboard on the Commodore 64, the kernal tries to read the keyboard matrix.
First, here is what the matrix looks like – the image is from the Commodore 64 Service Manual:

We can watch the keyboard matrix work ourselves, using a BASIC program.
First, we need to turn off the kernal IRQ handler. This link tells us how to do that. Basically, we need to put a zero in the first bit of byte 56334 ($DC0E). Doing this will disable the keyboard, so we want to turn the IRQ handler back on at the end of the program, by putting a one in the first bit of byte 56334 ($DC0E). I turn the handler off in line 10 and back on in line 1000.
Now we are ready to probe the keyboard matrix. Here’s how that works. First, we poke a byte into $DC00 (56320) that indicates which set of eight possible characters we want to test for. In that byte, seven of the eight bits will be high, and one of the bits will be low – the low byte indicates which set of characters we are looking for (which row in the matrix we are probing). So the possible values are:
In the program below, I set the row byte in line 100. In the example, we are reading row 0.
Then, from 120 to 150 a FOR/NEXT loop waits for a key to be pressed. We can read the column number of the key pressed in byte $DC01 (56321). If no key is being pressed, that position will hold an $FF (255). If a key is being pressed, it will hold the column number of the pressed key, using the same format as for the rows above (254 -> 0, 253 -> 1, 251 -> 2, etc.) Thus, the number we poked into $DC00 and the number we read peeked from $DC01 gives us 8 x 8 or 64 possible characters as we see in the image from the service manual above.
Here is the code:
10 POKE 56334, PEEK(56334) AND 254
100 POKE 56320, 254
120 FOR I = 1 TO 5000
130 X = PEEK(56321)
140 IF X <> 255 THEN PRINT X : GOTO 1000
150 NEXT I
1000 POKE 56334, PEEK(56334) OR 1
Here is the matrix that I worked out, by putting all eight row values into $DC00 in line 100, then pushing keys until one of them gives a value that is not $FF in $DC01. I used my real C64C to be sure I was seeing what the real keyboard matrix looked like, rather than an artifact of WinVICE.
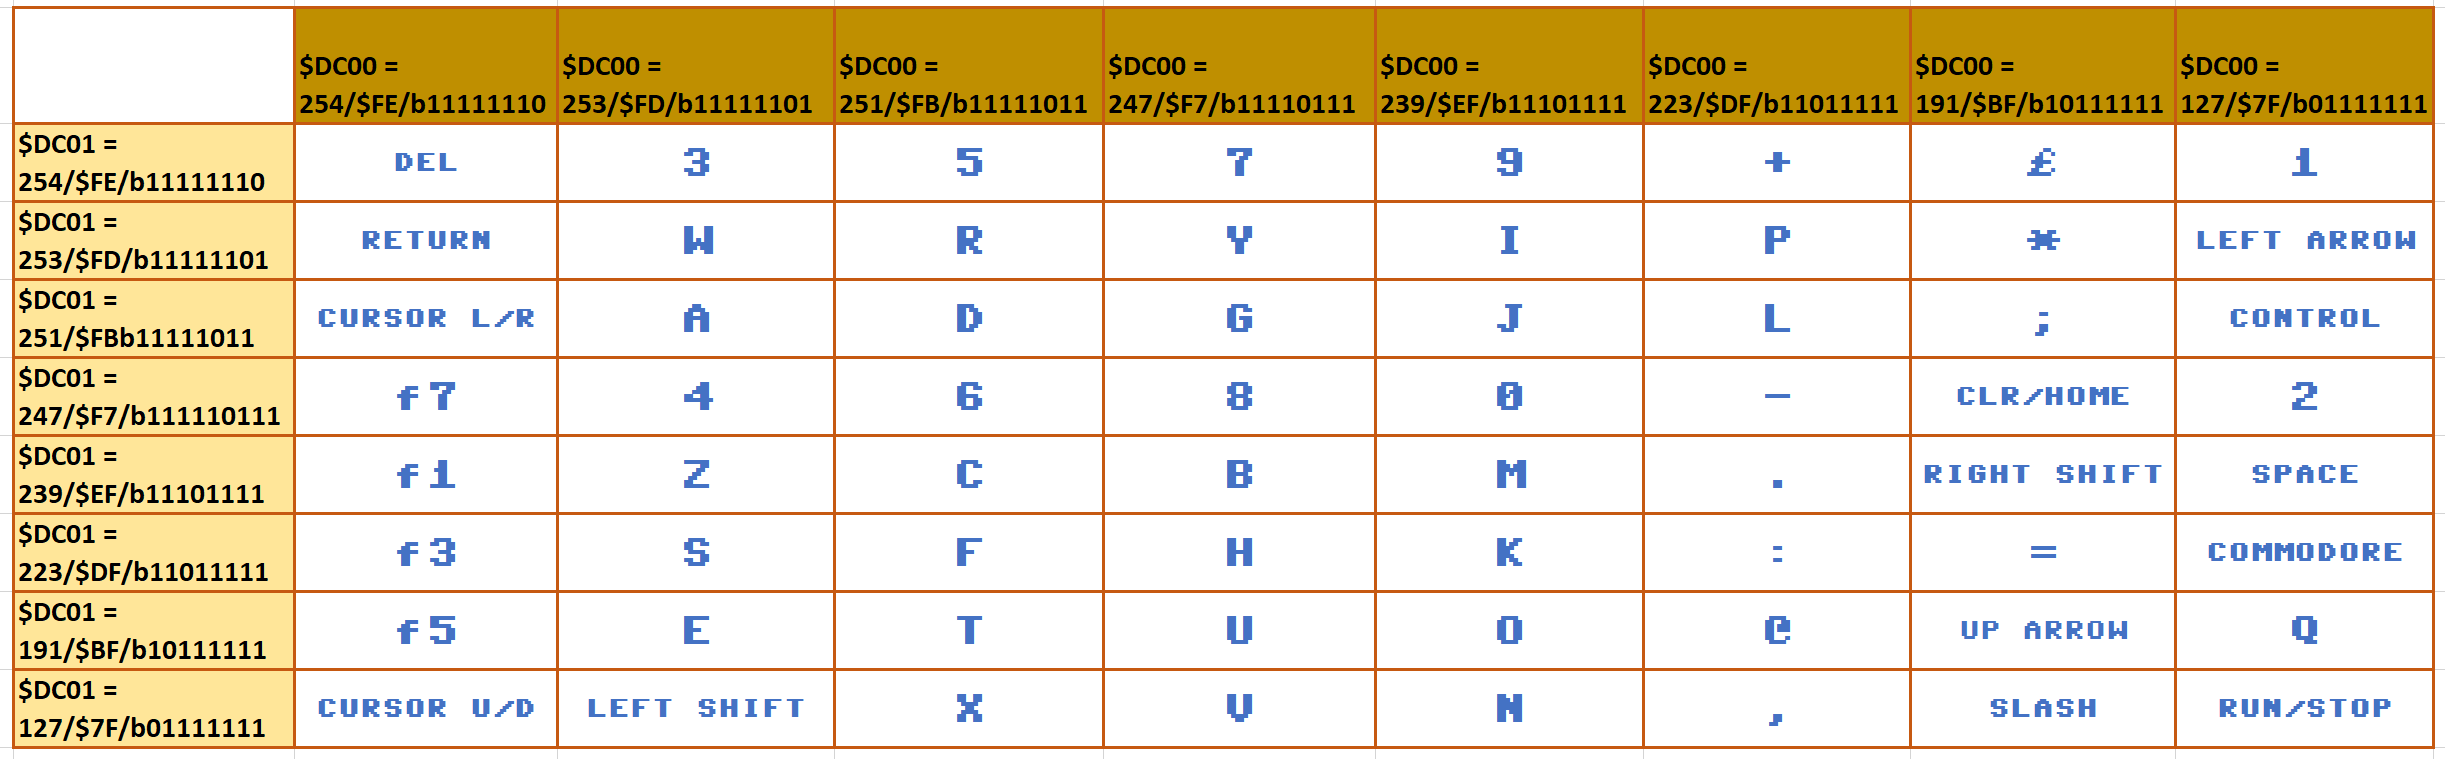
It is the same as the one from the manual, except that I reorganized the rows and columns to go in numeric order of the byte they contain, rather than trying to preserve any of the geography of the actual keyboard.
When the matrix has been read, the keyboard code is placed in the zero page memory position 203 ($CB). Then, before the keyboard is scanned again, the value in 203 is moved to 197 ($C5). When no key is being pressed, the value 64 ($40) is placed in 203, then is moved to 197 before the next scan. So, the situation that indicates “a new key has been pressed” is that 197 contains 64 and 203 contains a value less than 64.
This little program tests this. Because the keyboard matrix scan is fast and BASIC is slow, I have to press a key several times in order to have BASIC catch the transition between not pressed and pressed – awkward, but it demonstrates the concept.
100 X = PEEK(197) : Y = PEEK(203)
120 IF X = 64 AND Y <> 64 THEN PRINT Y
140 GOTO 100
Here is the table I developed using my real C64C. It is pleasingly alike to the table found on the c64-wiki here.

The table on the wiki indicates that code 63 ($3F) is RUN/STOP but I didn’t include that as the program in its current state can’t test that.
Having acquired the keyboard code for the pressed key, we now need to determine whether or not a SHIFT or CTRL or C= key was simultaneously pressed. To do that we can read memory position 653. It will equal:
So, after reading the matrix and assigning a keyboard code, and determining if a SHIFT or CTRL or C= is simultaneously pressed, the next step is to determine what character should be entered into the keyboard buffer as a result of the key press.
There are four lookup tables:
Let’s look at one or two elements of these lookup tables. I know that if I press A, the keyboard code is 10. PEEK(60289 + 10) gives me 65, which is in fact the PETSCII code for A.
PEEK(60354 + 10) gives me 193, which is the PETSCII code for a playing card spades symbol in a box, which is what I would get on the Commodore if I typed in SHIFT-A.
You can find an excellent PETSCII table here.
A statement like IF PEEK(653) = 0 THEN A$ = CHR$(PEEK(60289 + PEEK(197))) shows how the lookup tables work.
Let’s take a look now at the keyboard buffer, which is ten bytes from 631-640 ($0277-$0280) that hold as yet unprocessed key presses. Zero page byte 198 ($C6) holds the number of entries in the buffer – from 0 to 10. The little program below lets you watch the keyboard buffer being filled in, including tracking the number of entries. When an input statement is encountered, the buffer is read in, and the number entries reset to zero. So run the program, and press keys while the loops are running. Be sure that your last key is a RETURN.
100 FOR K = 1 TO 20
105 PRINT CHR$(147)
110 FOR J = 1 TO 5
120 FOR I = 631 TO 640
130 PRINT PEEK(I),
140 NEXT I
150 PRINT PEEK(198) : PRINT
160 NEXT J
170 NEXT K
Here is a kind of fun program that lists itself when run. It puts the characters “L”,”I”,”S”,”T” and RETURN into the buffer, and then the number of entries (5) into 198. When the program is finished, the buffer, including the RETURN, is read and processed by BASIC, and the program lists itself.:

That’s all for now. For a cultural dive into the 8-bit era, I recommend dusting off your copy of Orson Scott Card’s Ender’s Game – it’s a lot of fun.

